Monday, April 12, 2010

Upcoming Scrapbooking Classes

Scrapbooking Class
Thursday, April 22nd, 6:00 to 9:00 p.m.
Rexburg Store

Learn unique ways to use die cuts.

In Kathy's class, use the negative space left from a die cut and fill with fun embellishments such as buttons, beads, and flowers.


Learn how to turn any die cut into a stamp in Stephanie's class.

We can't wait to see you there!


Saturday, April 10, 2010

Lil' Robots

Who doesn't love a cute little robot or two? This collection by My Mind's Eye combines bright colors with cute robots in coordinating paper, ribbon, brads, and chipboard. Check out this fun project you can make with your kids:

Start out with an empty tin. Cover it inside and out with papers and coordinating embellishments. Then personalize it with your child's name.


Layer the backs of chipboard robot stickers with patterned paper to cover the sticky part. Add a small magnet to the back of each robot. It's the perfect "quiet" toy for robot lovers, young and old!


Here are some layout ideas by Kathy using this collection:


Come see other new products that are rolling in daily!

Thursday, April 8, 2010

Family Tree Project

Looking for a unique way to display your family tree? Try this project, featuring "Lush" products from My Mind's Eye.


Cut your background paper, distress the edges, and adorn with ribbon. Attach to another 12x12 sheet of coordinating patterned paper. Cut a tree from flocked brown paper (template available in the scrapbooking department). Punch photos using various sizes of circle punches. Give a few of them dimension by attaching them with pop dots. Cut various sizes of leaves from green patterned paper and attach randomly. Finish with a title made from flocked alphabet stickers. Place inside a 12x12 shadow box.


The 2x2 blocks could be fun standing alone or displayed with the shadow box.

To make your own set, cover all 6 sides of each block with paper or photos. (You can pre-print a favorite saying onto some of the papers first). Ink around the edges of the blocks to distress. Attach chipboard letters to spell out your family name. Create the "knob" by threading beads onto a corsage pin. Drill a hole in the top of the block by pounding a nail half way, then remove it. Glue the pin with the beads into the hole with Diamond Glaze and finish it off with a little ribbon.

The possibilities are endless with this project! Yours is sure to be a treasure for years to come.


Wednesday, April 7, 2010

Class Reminder

Don't forget about Scrapbooking class tomorrow night from 6:00 to 9:00 in our Rexburg store. Can't wait to see you there!

by Kathy

by Stephanie

Tuesday, April 6, 2010

2nd Saturday

Come and get out of the blustery weather at our 2nd Saturday Class, April 10th, at 8:30 a.m.

This month in scrapbooking we will be focusing on die cuts, specifically those from "QuickKutz." It is a great class for beginners and advanced scrappers. There are new techniques taught, new products introduced, new friendships formed, and prizes to be won. Hope to see you there!


Monday, April 5, 2010

New Kit of the Month

Sometimes the most important lessons aren't taught in school. What important truths has life taught you?

This album makes it easy to jot down those all-important bits of knowledge. Retro-inspired papers, a half-sheet of rub-ons, and cardstock cut-outs make a booklet that begs to be read-- all on an adorable mini clipboard. No photos required, so make one right now!

Kits available in the scrapbooking department at the Rexburg store.


Kit designed by Maureen Wilson

Thursday, April 1, 2010

New We R Memory Keepers

We are so excited about all the new product we have rolling in!

Among our favorites are the newest collections from We R Memory Keepers. Besides the beautiful double-sided papers, cardstock stickers, embossed embellishments, acrylic stamps, and glittered or flocked lace, we are also carrying completed page kits and card kits that are ready to assemble. They are very economical and perfect for the busy crafter.


Matching cardstock comes with an actual stitched border, making a beautiful, textured background.
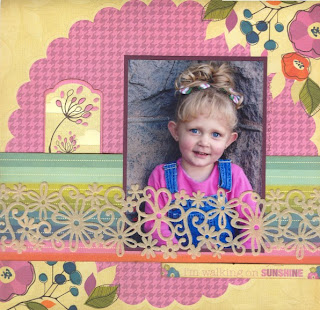

Some of the individual papers also come pre-designed. Just add your photo, lace or other simple embellishments for a fast and easy layout.


Here's another example of a pre-designed page. Candi just added a punched border, brads, and a tag.


The colors in this collection are fresh and new!

Click here for more project ideas.